

React Rails travel app case study


Have you ever wanted to track countries you visit using an app? As someone who loves to travel, I do, and as a developer who strongly believes in lifelong learning, I decided to take the opportunity to build a simple app while familiarizing myself with some awesome new tech, including React Rails. This post will go into the building of this app using Ruby on Rails 5, which comes with the React Rails gem. If you'd like to see it and try it out, check it out here.
Features
The user:
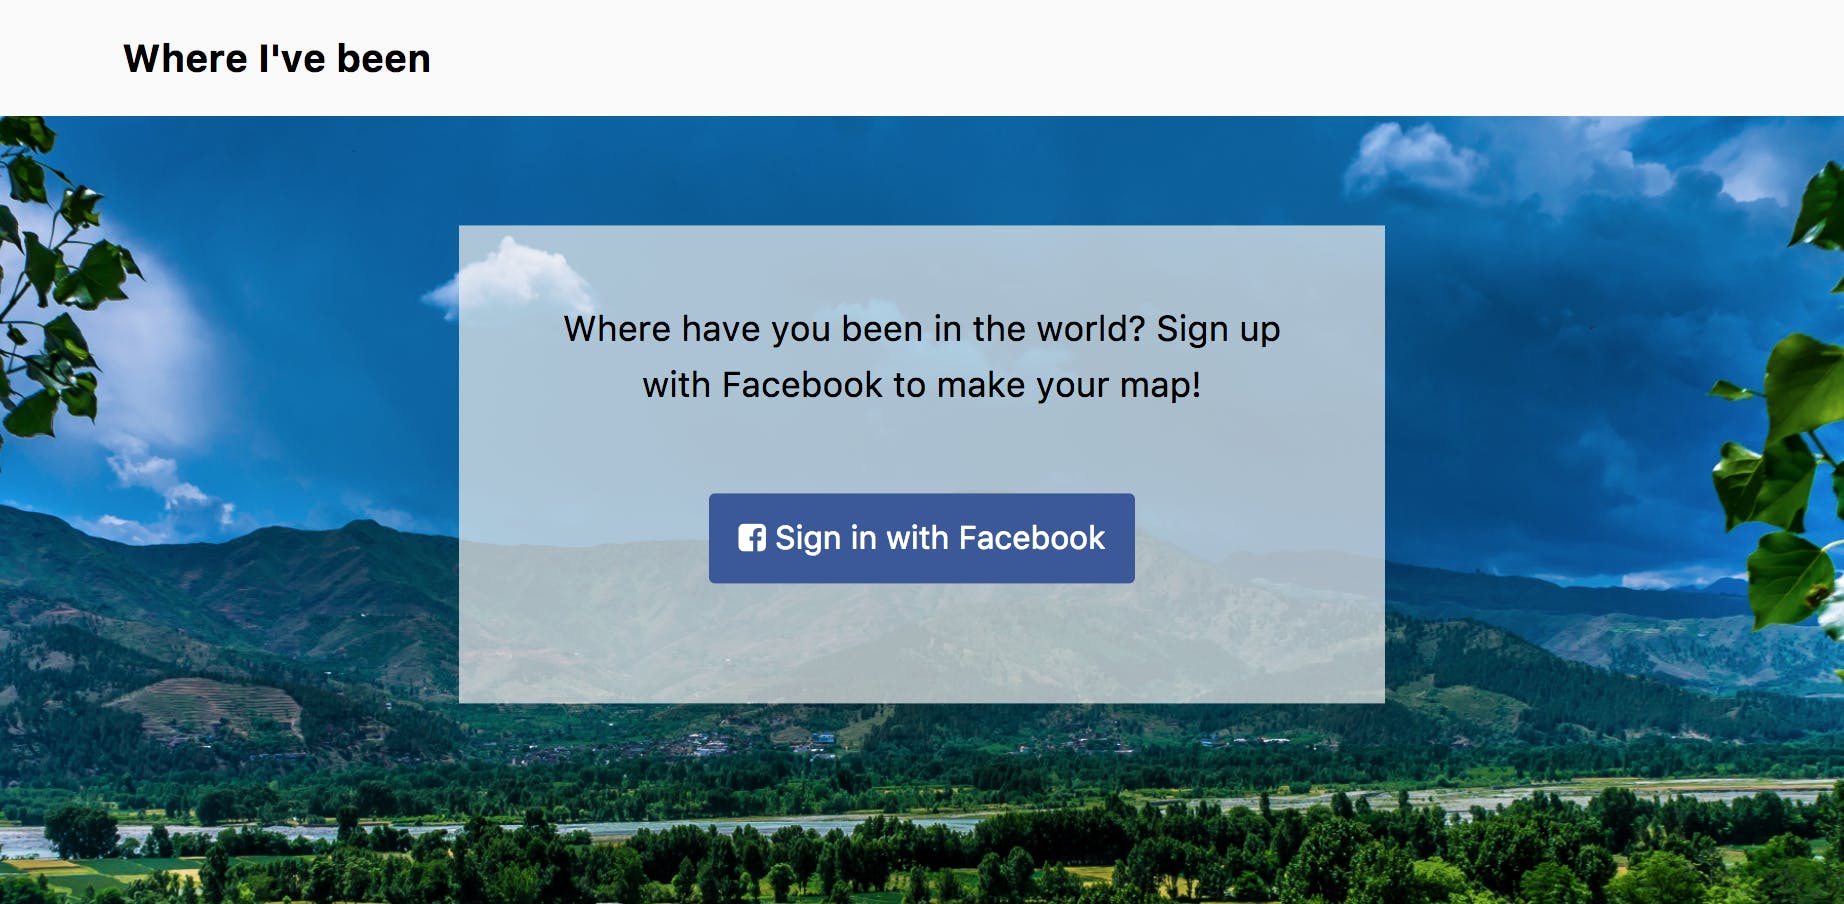
- will be able to login with Facebook and will not have to type in a password
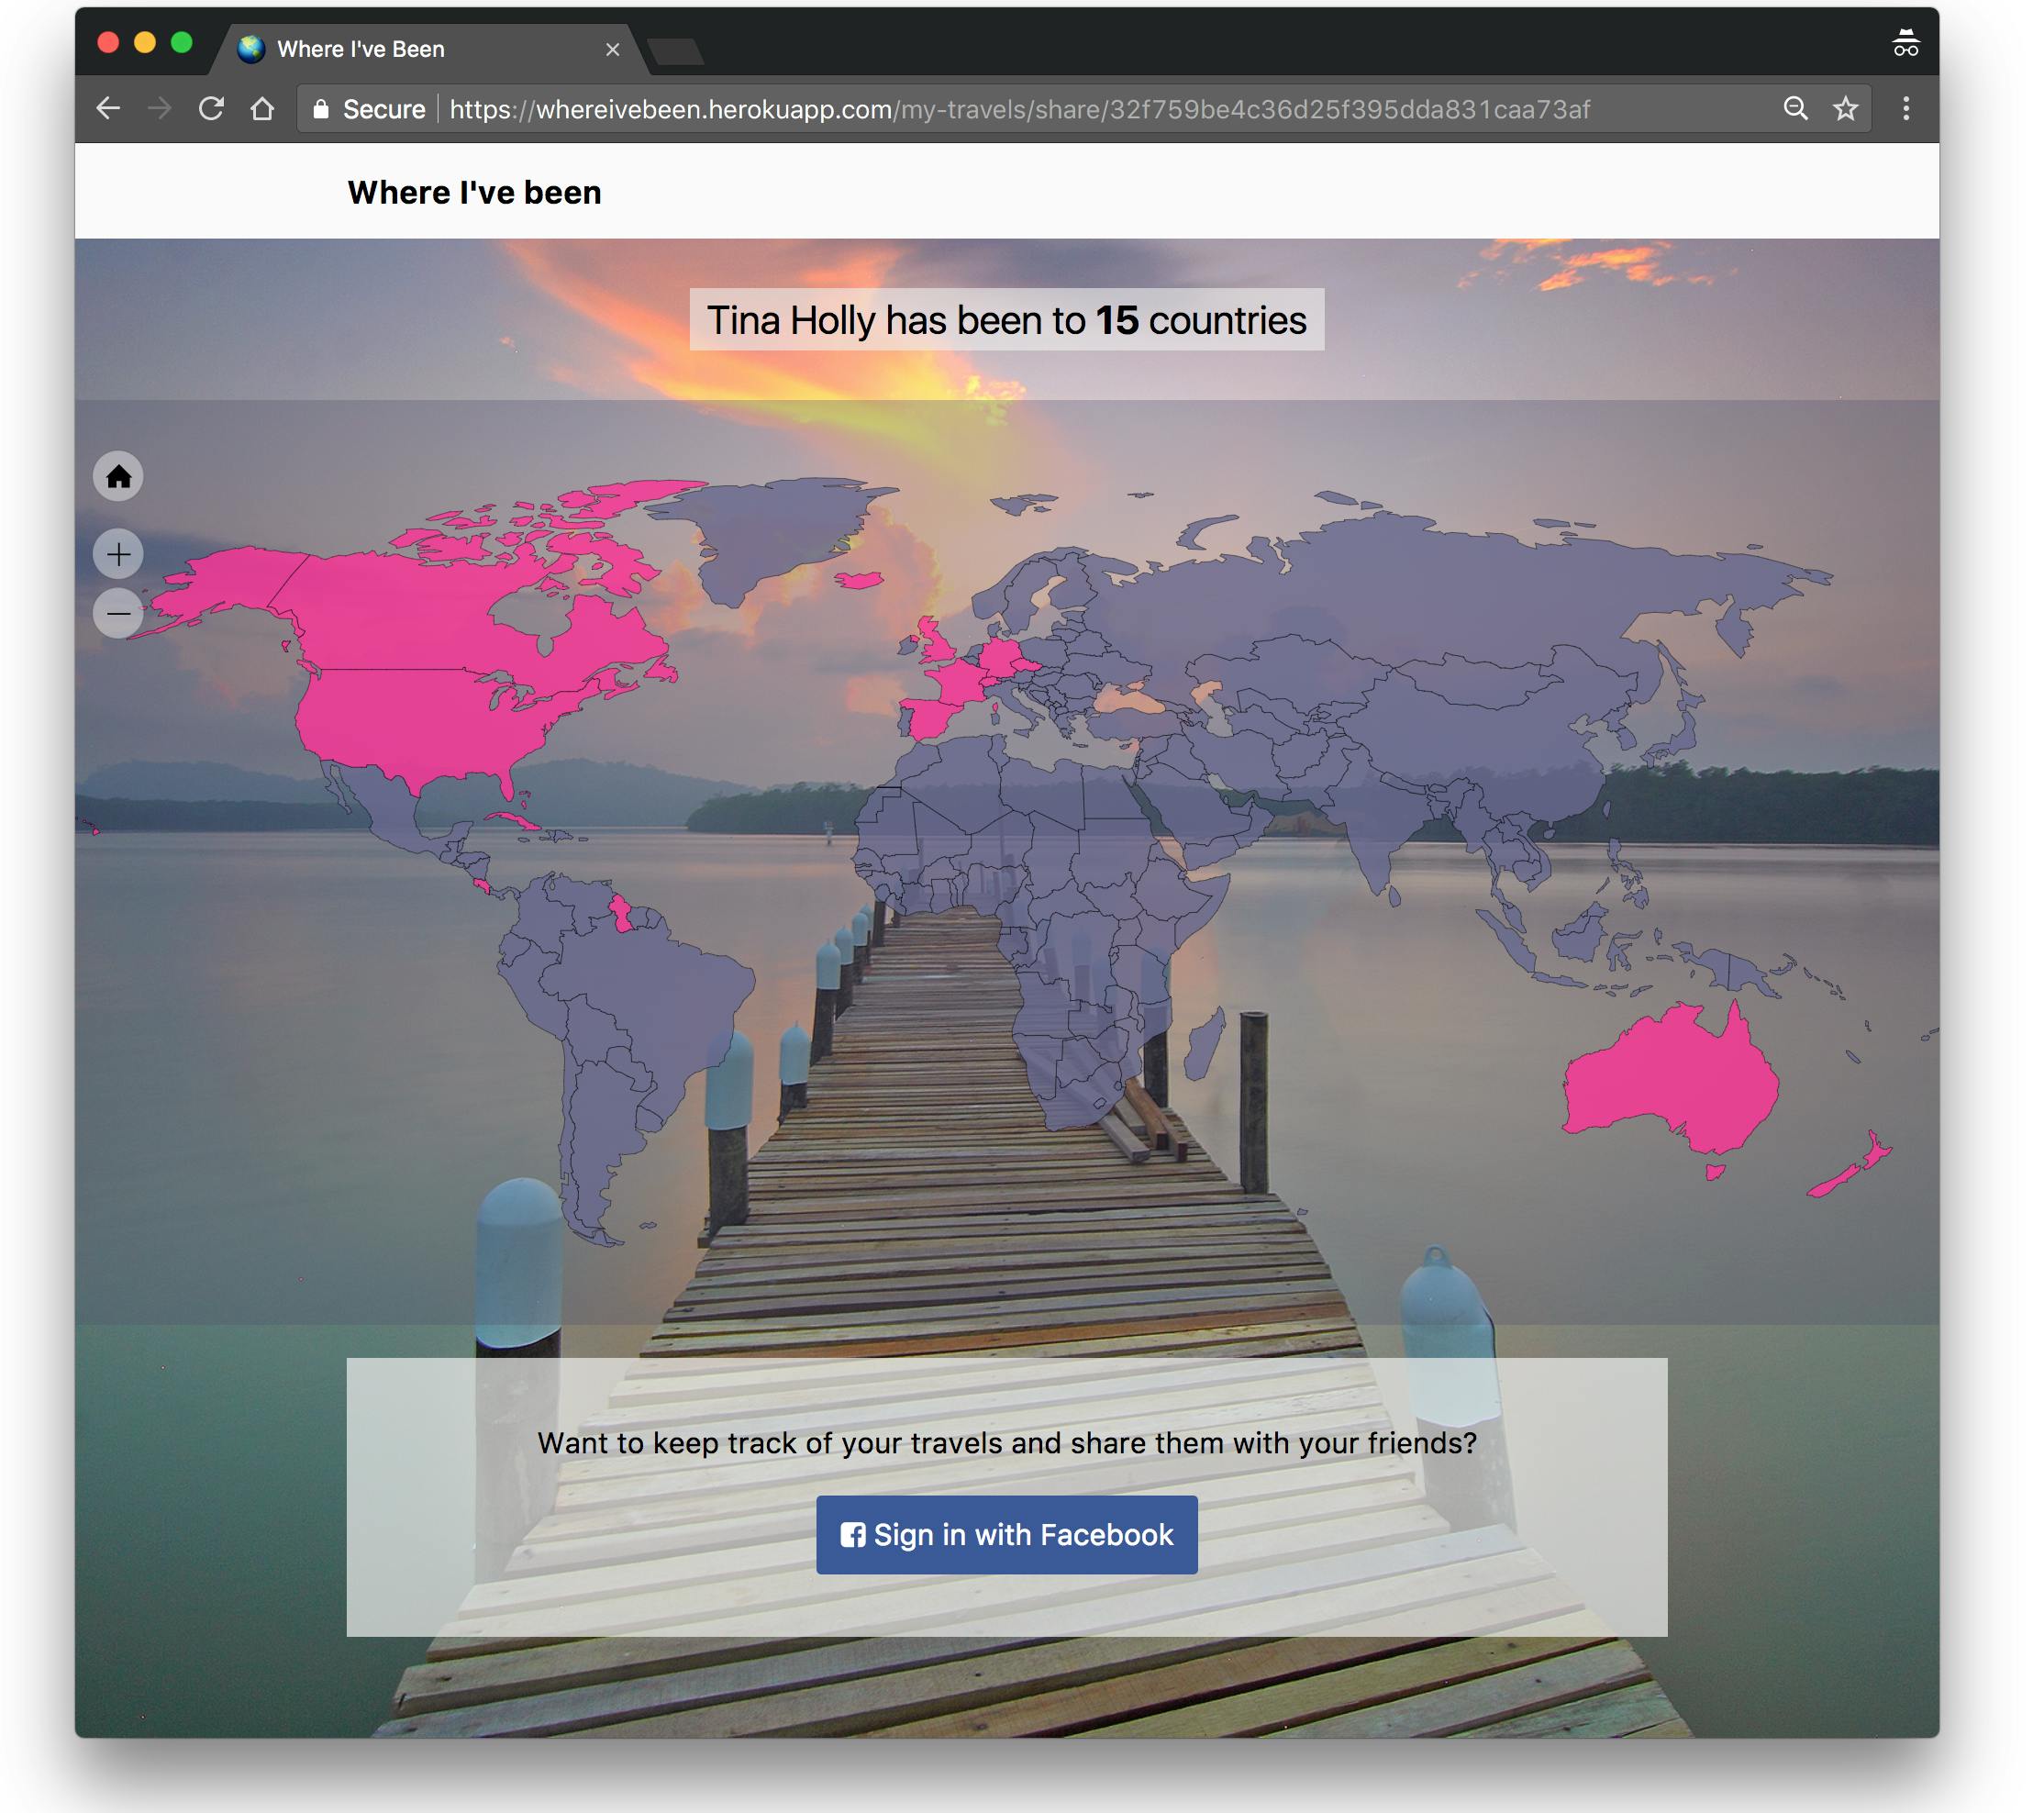
- can choose countries using a type-ahead style input, or by clicking on the interactive map
- can share their customized map with friends using a permalink by copying and pasting the link, or clicking the buttons to share to Facebook, Google Plus, or Twitter
- can customize the colour of the selected countries using a colour picker
Technology
- Rails 5
- React Rails gem
- amCharts charting library for JavaScript maps
Having heard great things about the new React integration with Ruby on Rails, I wanted to see for myself how great it was. I also wanted to take the opportunity to try out a mapping library.
Getting started
To get started, I used the newest version of Ruby on Rails to generate a new project. Some additional gems include the following:
- pg for PostGres
- OmniAuth and OmniAuth Facebook for authenticating with Facebook
- jQuery turbolinks
- React Rails (already included with the newest Rails v5.x as of this post)
- jquery-minicolors-rails for a quick and dirty colour picker that sits on top of an input field
- FontAwesome Rails for awesome font icons
PostGres
I chose PostGres instead of MySQL because of the JSON field, which I figured would be useful for storing the countries a user visits. This format plays nicely with JavaScript, and since most of the heavy lifting would be done there, I decided to use that rather than a more strictly defined schema.
Authentication
I used the OmniAuth gem with the OmniAuth Facebook add-on to allow for authentication via Facebook. There are quite a few security benefits to doing it this way.
No passwords required
Signing in with Facebook means that users don't have to memorize another password for your app. Memorizing yet another username and password will make users contemplate whether your app is worth the real estate in their memory, and requiring them to memorize credentials may makes them more reluctant to sign up. If they know it's as easy as clicking a button to authenticate with an existing service, they may be more likely to sign up.
This also means that Facebook (or another auth provider) does the heavy lifting of authenticating your user, and allows you to validate their session using an app-specific token. You don't store users' passwords in a database, so if your app gets hacked, your users' credentials are worthless to attackers—only the aforementioned token is available to them, which can only be used for your app at the domain it lives.
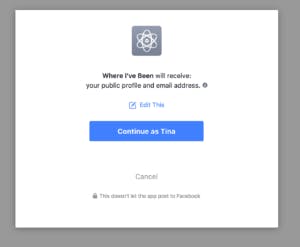
When creating an app using Facebook login, you can choose the scope of the information you get from your users. This app uses only the bare minimum, including public profile and email address. Facebook only allows one account per email address, so this is a reliable unique identifier to store in the users table in the database.
JavaScript development in Rails using React
Rails 5 comes with the React Rails gem which integrates React with JSX transpilation in the asset pipeline. If you've worked with React before, you may have realized there are many ways to work with React, including but not limited to Browserify and Webpack. React Rails doesn't appear to use either of these approaches for loading modules—it only runs your JavaScript code through Babel in the asset pipeline. Out of the box, everything is in the global scope, so to avoid polluting your global scope, you may want to wrap your React components in Immediately-Invoked Function Expressions, and expose only the components you wish to access from other files. Another more involved option is to set up React Rails to work with Webpack using the Webpacker gem, which is a much more familiar way JavaScript developers can use to work with React. Using Webpack will allow you to use ES6 modules (i.e. import and export statements). IIFEs are also not a thing when using Webpack. The root component of my app looks like this:
(function () {
  /**
   * Bootstrap the app with the Redux Provider and initialize the server-side data into Redux
   */
  class App extends React.Component {
    render() {
      return (
        <Provider store={window.__store}>
          <DataComponentContainer defaultData={this.props}>
            <WhereIveBeenContainer />
          </DataComponentContainer>
        </Provider>
      )
    }
  }

  window.App = App;
})();
I wrapped every component in an IIFE and explicitly exposed components I'd like to access from the global scope. I can then access my App component in the ERB templates using the following:
<%= react_component("App", {
  countries: @countries,
  userCountries: @user_travels.countries,
  customColour: @user_travels.colour
}) %>
My React app uses Redux. Bootstrapping the Rails data from the ERB template was less than glamorous, and involved the participation of a component specifically for that, which I've called DataComponent. It takes the props passed in from the ERB template, and puts it in the Redux store. I used a single file for bootstrapping the Redux portion of my app. Here's a sample:
/**
 * Bootstraps the Redux store on window.__store
 */
(function () {

  const { createStore, applyMiddleware } = Redux;
  const thunkMiddleware = ReduxThunk.default;


  /**
   * State
   */
  const initialState = {
    countries: [],
    // ... Other initial state variables here
  };


  /**
   * Action types
   */
  const SET_COUNTRIES = 'SET_COUNTRIES';
  // ...


  /**
   * Actions
   */
  const actions = {

    updateCountries: (countries) => ({
      type: SET_COUNTRIES,
      countries: countries
    }),

    // ... Mo' actions

  };


  const reducer = (state = initialState, action = {}) => {
    switch (action.type) {
      case SET_COUNTRIES:
        return {
          ...state,
          countries: action.countries
        };

      // ... Mo' action type handlers

      default:
        return state;
    }
  };


  /**
   * Globals
   */
  window.Provider = ReactRedux.Provider;
  window.__actions = actions;
  window.__store = createStore(reducer, applyMiddleware(thunkMiddleware));
})();
Not all Redux plugins worked in the browser and need to use Node's require module, so if you have to develop a complex web app, I would hook up Webpack so you can use any of the Redux middleware via Webpack. The above bootstrapping code is quite hideous by the standards of anyone who's ever worked with Browserify or Webpack, but if you wanted to use React out-of-the-box with Rails 5 without any additional bootstrapping, wrapping all the bootstrapping code in an Immediately-Invoked Function Expression (IIFE, pronounced "iffy") is probably the quickest way to get started. Here's a fun pun:
To get a React Rails app done in a jiffy, use an IIFE! 😂
Directory structure
My JavaScripts directory structure is as follows:
app/assets/javascripts/ ├── application.js ├── cable.js ├── channels ├── components │ ├── App.jsx │ ├── CountryCount.jsx │ ├── CountrySelector.jsx │ ├── DataComponent.jsx │ ├── MapComponent.jsx │ └── WhereIveBeen.jsx ├── components.js ├── facebook.js ├── main.js ├── options.jsx ├── redux_bootstrapping.jsx └── server_rendering.js
There are only three actual components to the app, the rest are bootstrapping. The components.js file just pulls in the components directory tree. The facebook.js file has the code for handling Facebook login.
Countries map data
If you're wondering how I got the country data, it was provided by the amCharts Maps low-resolution map data. If you look at the source code, you will be able to see it, but essentially all of the SVG paths are specified in the script file you need to include to get your map going.
{ "id": "CA", "title": "Canada", "d": "M198.93,96.23l-0.22,.......108.88zM248.49,155.83l3.08,5.1l0." }
I created a Node script to consume this data and export it into a JSON file that provides an array of countries including only the id and title fields. It's a simple cleanup script that just takes everything and returns only those fields.
Miscellaneous things
Randomizing background images
A fun and easy feature I added was the randomizing background images. I found a bunch of Creative Commons-licensed stock photos and included them in the app in a directory called backgrounds. Details on how to get a random image from a directory using Ruby on Rails can be found at my Stack Overflow answer to a related question.
jQuery-related things
jQuery is still a tried, tested and true way to work with the DOM on websites. One of the features I developed was the ability to customize the colour of the selected countries.
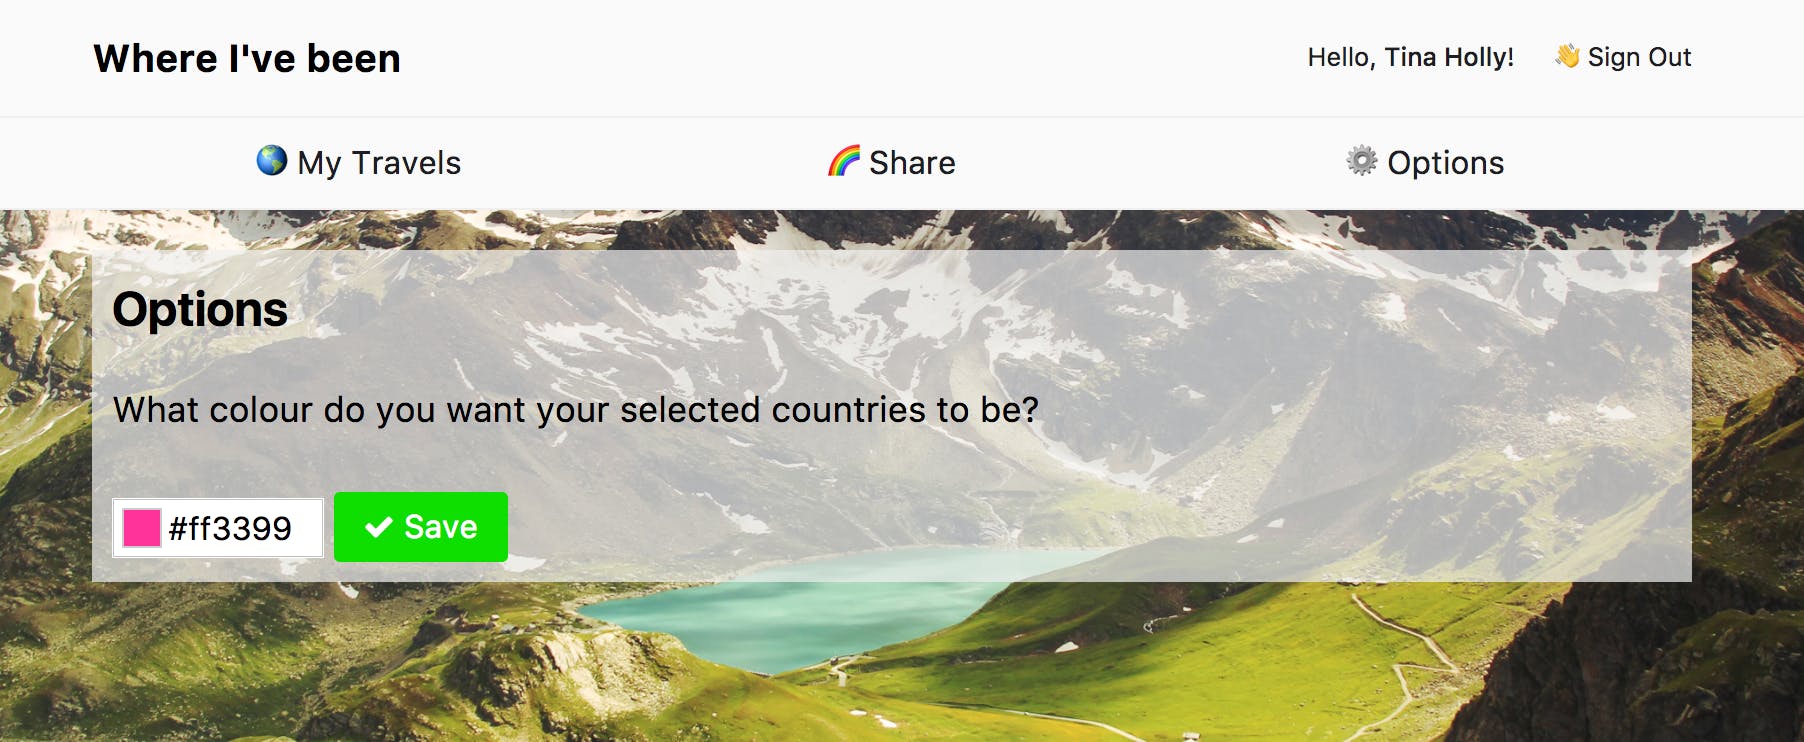
This is using the above-mentioned colour picker gem, which can easily be initialized in an ERB template as follows:
<%= f.text_field :colour, class: 'js-colour-picker options__colour' %>
You can then activate the plugin in JavaScript using the following code:
$(document).on('turbolinks:load', function () {
  $('.js-colour-picker').minicolors();
});
You may have noticed some turbolinks stuff—Rails uses a feature called Turbolinks which allows you to change pages without refreshing your JavaScript on every page load. This makes for a faster front-end, but plugins that would traditionally be executed on document ready now need to be executed on document turbolinks:load otherwise they risk not being initialized when you'd normally expect them to be.
Type-ahead component
I used the React Typeahead plugin which was installed using NPM and included in the application.js file as so:
//= require react-typeahead/dist/react-typeahead
The node_modules directory lives on the path, so the assets pipeline understands to look there for Node module using the above syntax. You can use the Twitter Bootstrap styles, or style it yourself. I opted for the latter approach.
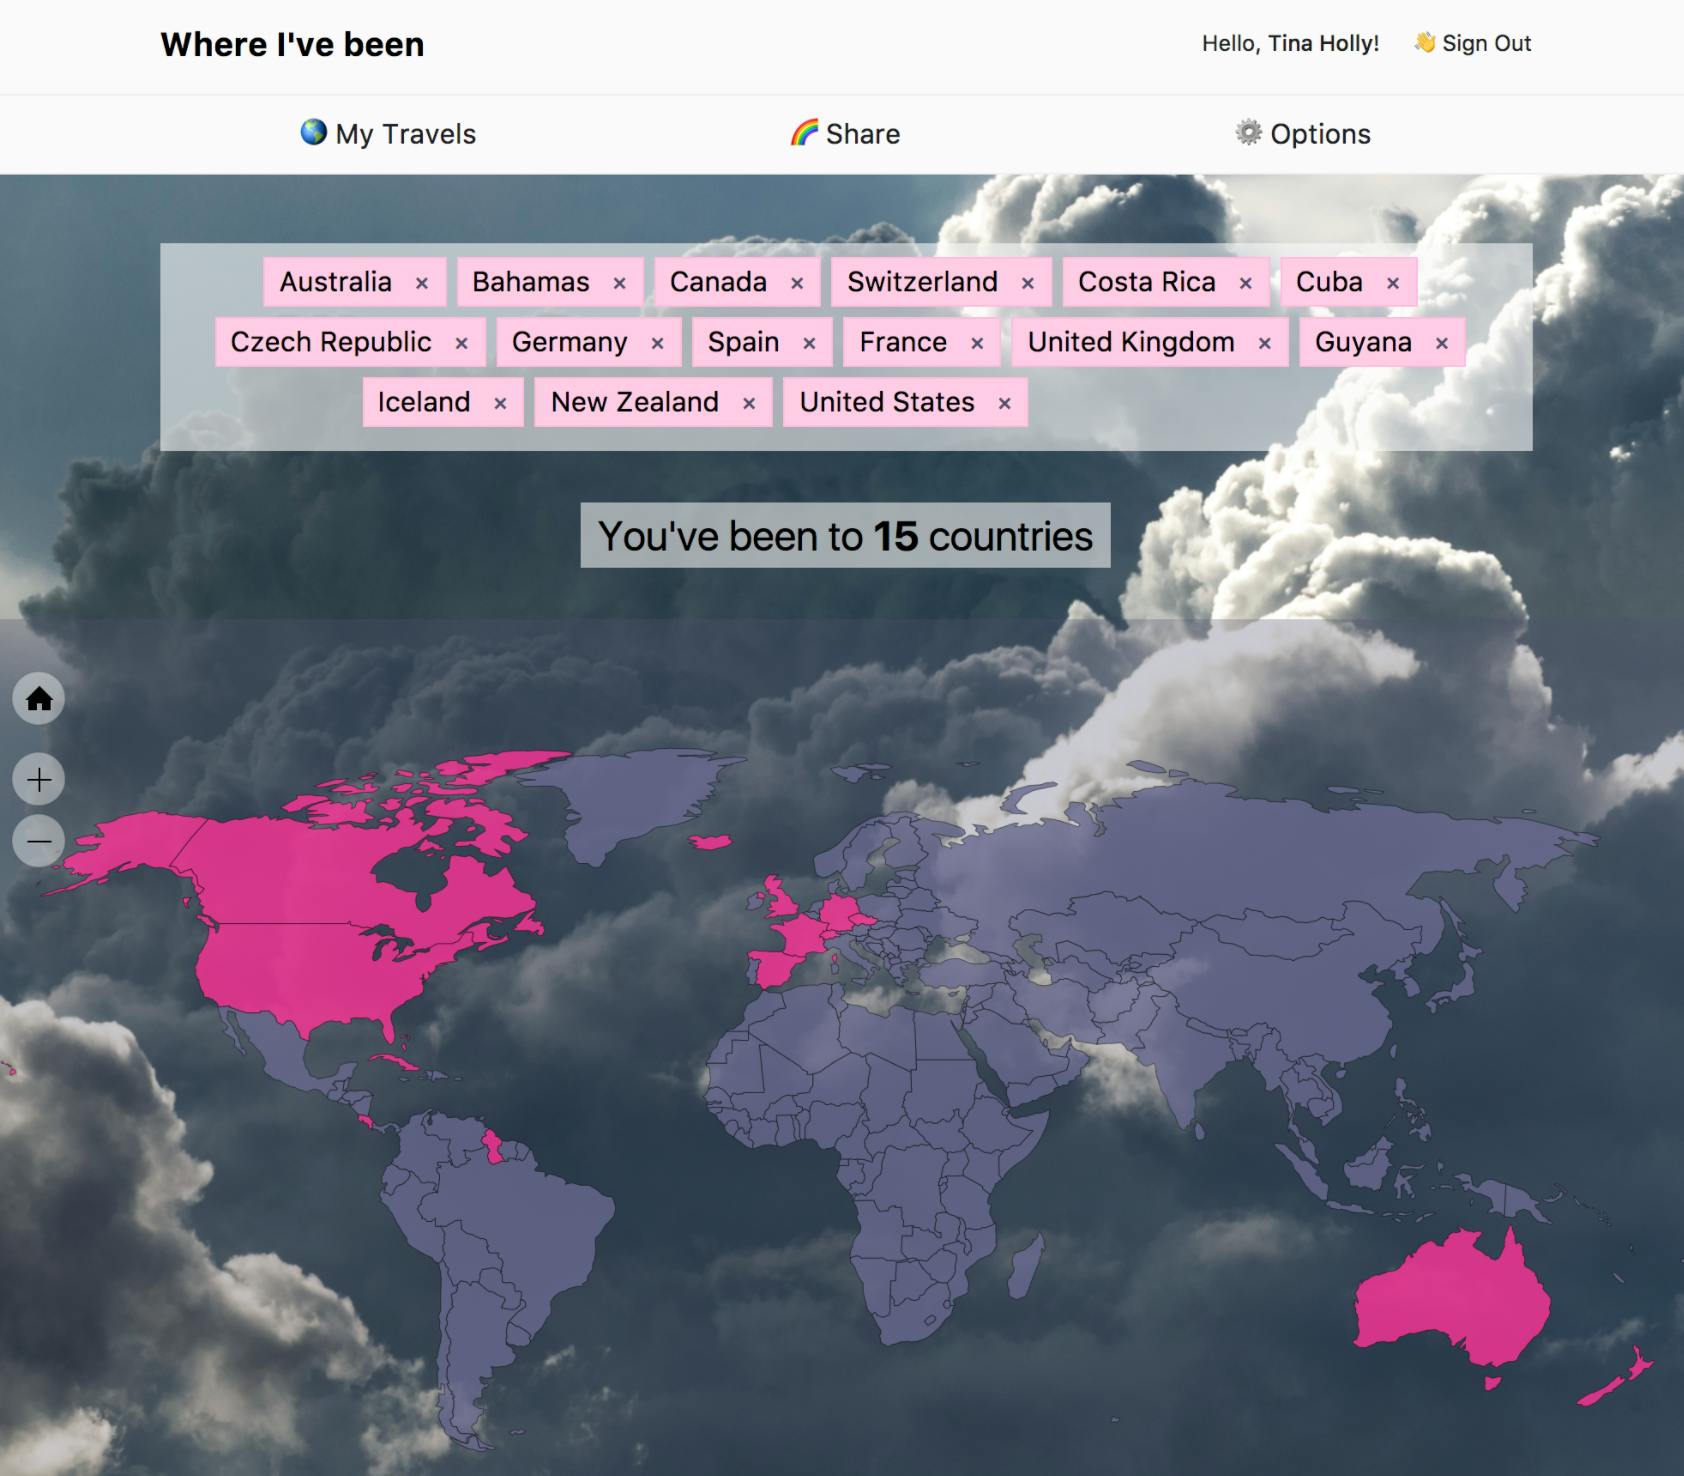
It uses the Tokenizer approach, and each of the pink boxes is considered a token. Check the React Typeahead documentation for details on how to implement React Typeahead.
Map sharing feature
One of the features I developed was the ability to share the map using a custom link.

I added a share identifier to the travel data, which is essentially just a random hash. I created an indexed column on the Travel data. This share ID is automatically created on the on-create controller lifecycle method callback.
class Travel < ApplicationRecord
  belongs_to :user
  before_create :set_defaults

  private

  def set_defaults
    self.share_id = SecureRandom.hex
  end
end
I have a Travel model that belongs to a User. Before the Travel record is created, it creates its own share ID. The social media share links are generated with each social site's recommended way for sharing. Twitter and Google Plus use intent URLs, whereas Facebook's uses the Facebook web SDK.
Deploying the React Rails app to Heroku
I used Heroku to deploy the app since it's the quickest, easiest, and cheapest way I've found so far. My package size is a bit large due to the randomizing background images, but other than that, the experience was flawless. Heroku is a great way to get an app hosted immediately with very little commitment. Provided your Gemfile has all the required gems in it, you should be able to deploy without any additional setup—Heroku will auto-detect your Rails app and use its Rails buildpack to compile and serve your app. You'll need to configure your production database to use the URL of your PostGres database add-on, but that is easily done in the database.yml file:
# MySQL
default: &default
  adapter: postgresql
  encoding: utf8
  pool: <%= ENV.fetch("RAILS_MAX_THREADS") { 5 } %>
  timeout: 5000

development:
  <<: *default
  database: where_ive_been

test:
  <<: *default
  database: where_ive_been_test

# Heroku
production:
  url: <%= ENV['DATABASE_URL'] %>
The above configuration uses PostGres locally on my machine, and uses the Heroku-provided environment variable for the database URL in production. You will need to add a plugin to Heroku to support PostGres. Once you do, the database URL environment variable will automatically be made available. There's no setup other than using this URL in the database configuration.
Conclusion
React Rails is a very welcome addition to Rails. As a (primarily but not limited to) Front-end Developer, I appreciate how they tried to make it quick and easy to get started with React as the front-end to a Rails-powered back-end. I haven't used a faster React setup, though I do hear good things about React Create App. If you want quick and dirty, for example, if you're building something at a hackathon where you have a limited amount of time and are comfortable in both React and Rails, I would totally recommend this approach. I would definitely recommend using Webpack if you're going to have a more complex React app, but for mine that had only three actual components other than the bootstrapping ones, this was a fine approach. Try out the app for yourself!